
We are starting a new series for ERP Acumatica developers. And the first article will be the most useful for beginners, as it directs us to the very basics of working with Acumatica.
Creating Custom Fields
One of the major and yet incredibly useful customisation features of the project for Acumatica ERP is the option to create their own fields. Special fields are added to the existing ones in standard database tables. To add those, it is convenient to use the creation of scripts in Settings interface. Database scripts Add Custom Column to Table
 You will also need to create an essential code for the fields to interact in PXCacheExtension for the output DAC class. At this point, there should not be any difficulties. Having accomplished this step, a developer is entitled to use their own fields. With the help of special fields you can store new essential values in the database, display the information from the database on the user’s screen, engage the data from these fields to request API or to record the data from the object of reply followed by a certain API request. Moreover, this type of field can be easily used to build a new, unique, and flexible business logic for a specific task. This function is utmost important and provides unprecedented flexibility for broadening the basic functionalities of Acumatica ERP.
It is essential to stick to certain rules while creating or working with such users’ fields. It is specifically important to remember that all the users’ fields must start with the prefix Usr in the database, and have an abstract class, also with the prefix Usr, as this is one of the prerequisites of the ISV software certification to be met, hence, it is yet another good reason to stick to this rule. You can find further information on this at “Acumatica ISV Software Certification Guidelines”. The names of new objects in your solutions must use their names given to them according to these rules.
Meeting the Requirements
One of the major issues related to not meeting the requirements of this rule is deletion of the users’ fields followed by system upgrade. Such a scenario leads to the loss of the functional software solution as well as to the loss of data stored in specific fields. Example:public abstract class usrFieldName: BqlType <IBqlBool, bool>.Field<usrFieldName> {}.
At first glance, everything is simple, however, what if the project already exists and the users’ fields are named without the prefix? There can be several reasons for that, the most common being: 1. Customisation was developed at the point when not enough attention was given to such requirements.2. Implementation of specific requirements was conducted while developing expanded functionalities.
To correct such, seemingly, a simple error is not easy. One of the reasons is that the data already exists and stored in the existing data base for these fields without Usr prefix.
At this point, I want to share with you one of the ways of how to successfully correct this flaw. Following the steps described below, the code itself and the settings will thoroughly comply with the requirements on creating and using special fields. To begin with, we will identify and form a plan of the work and changes which will have to take place:
1. First, identical to the existing fields need to be created in the data base, however, this time with Usr prefix.
2. Data transfer from the old fields to the new ones must be provided into the newly created fields, and deletion of the old fields to optimise data base must be done.
3. Correctly set the fields of the class into PXCacheExtension to the initial DAC class.
4. Then delete fields from the website pages which do not have the necessary prefix, and replace them with the equivalent ones, however, now with Usr prefix.
In the pictures provided below you can find a more detailed description of these steps.
Step 1
Start by creating your equivalent fields via the Settings window. Create your own fields with the help of customisation setting interface.
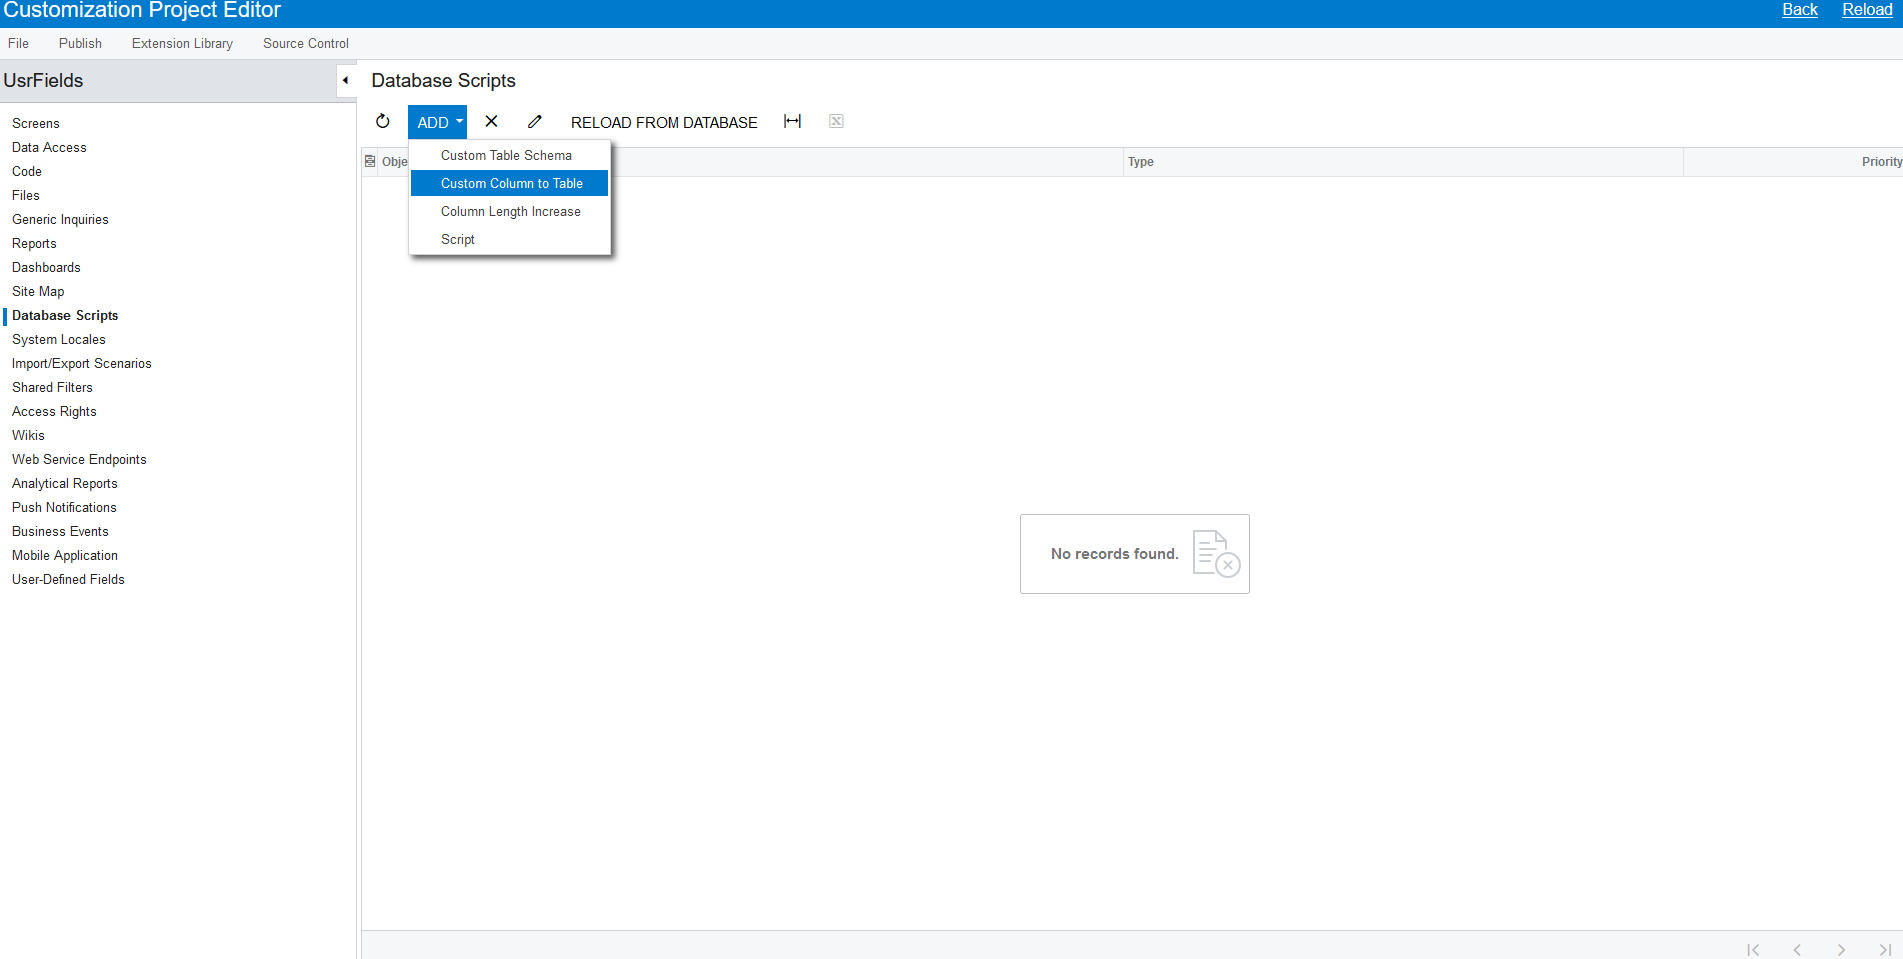
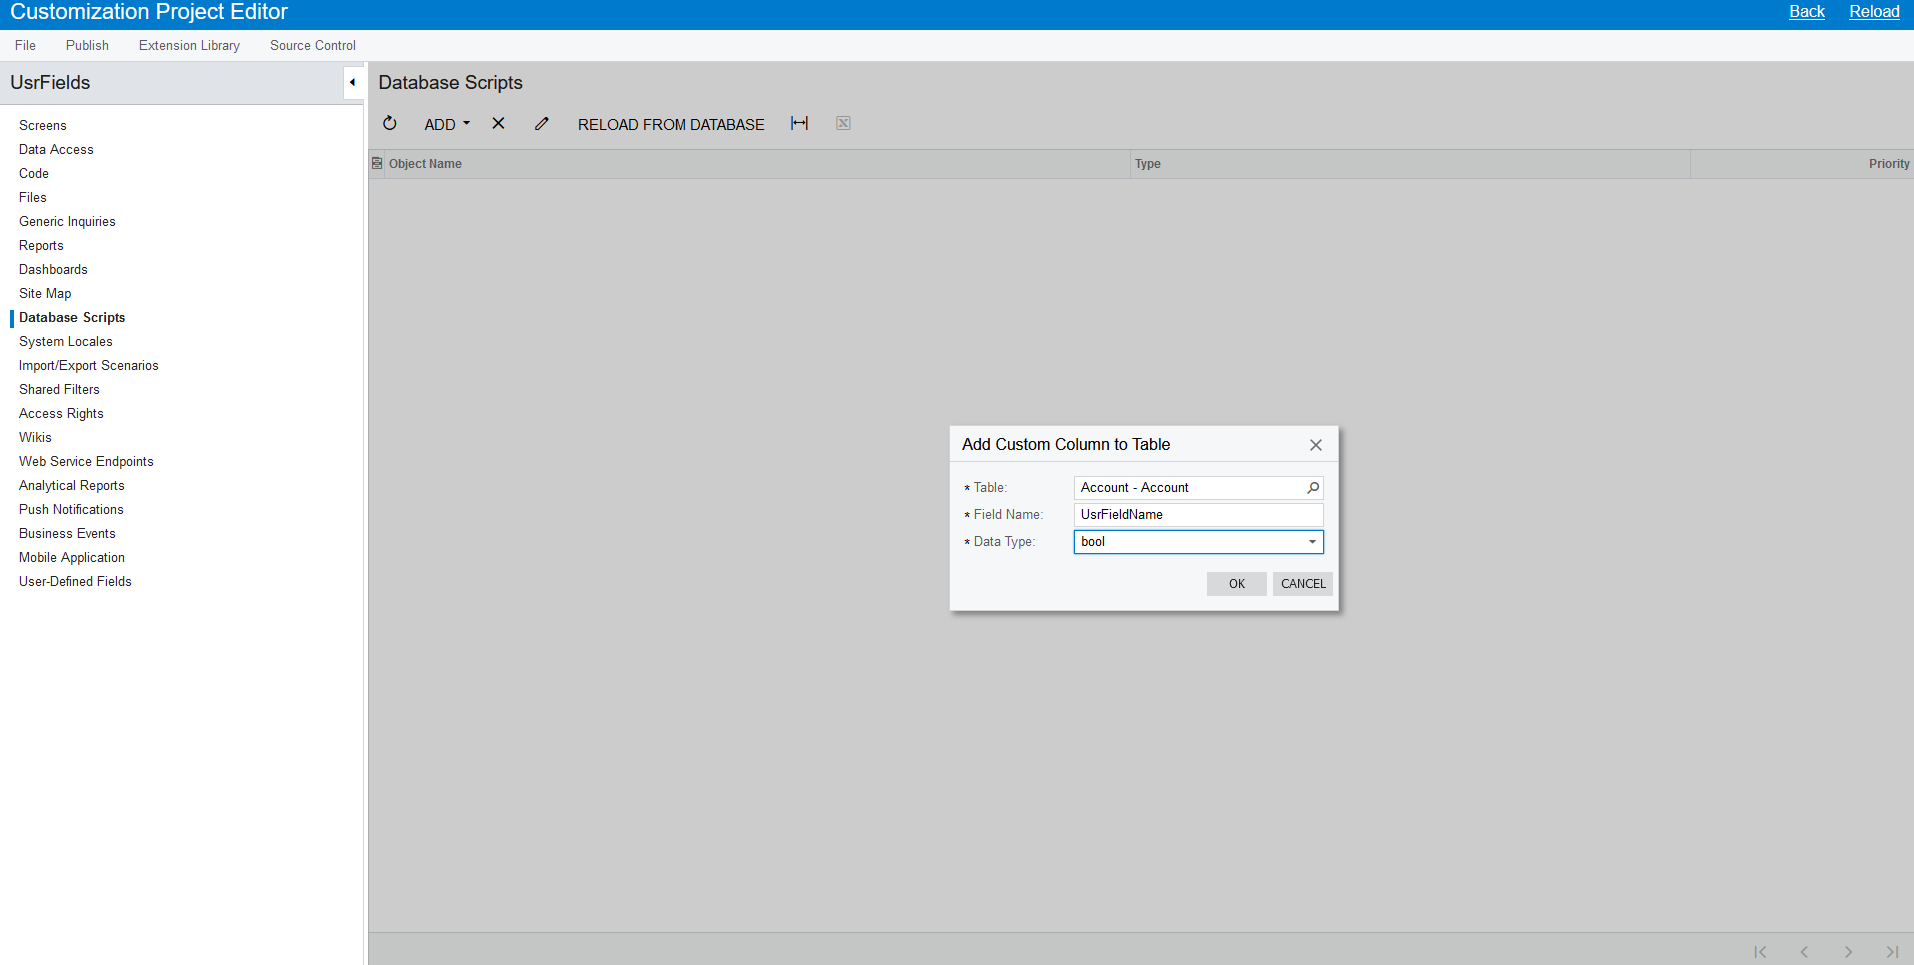
The next step will be to create your own fields with the help of customisation setting interface (the next step of creating). In order to do so, go to the settings on the screen Customization Projects (SM204505), then go to the menu option Database scripts Add Custom Column to Table. In the dialogue window, insert all the necessary parameters equivalent to the fields without the prefix.
Step 2
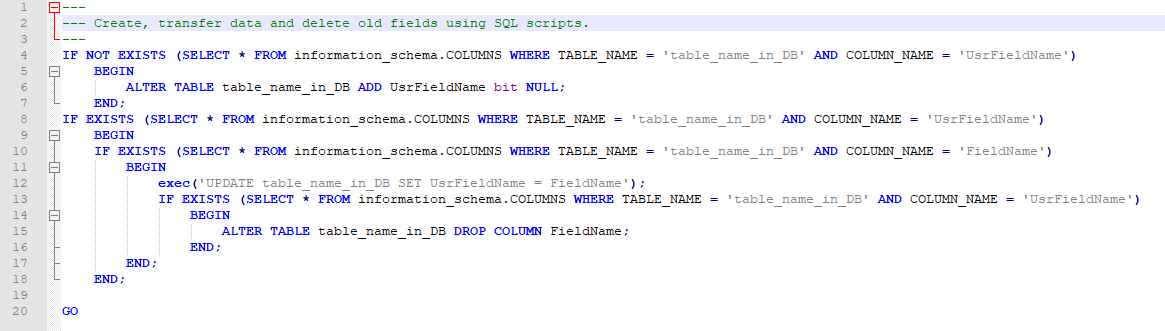
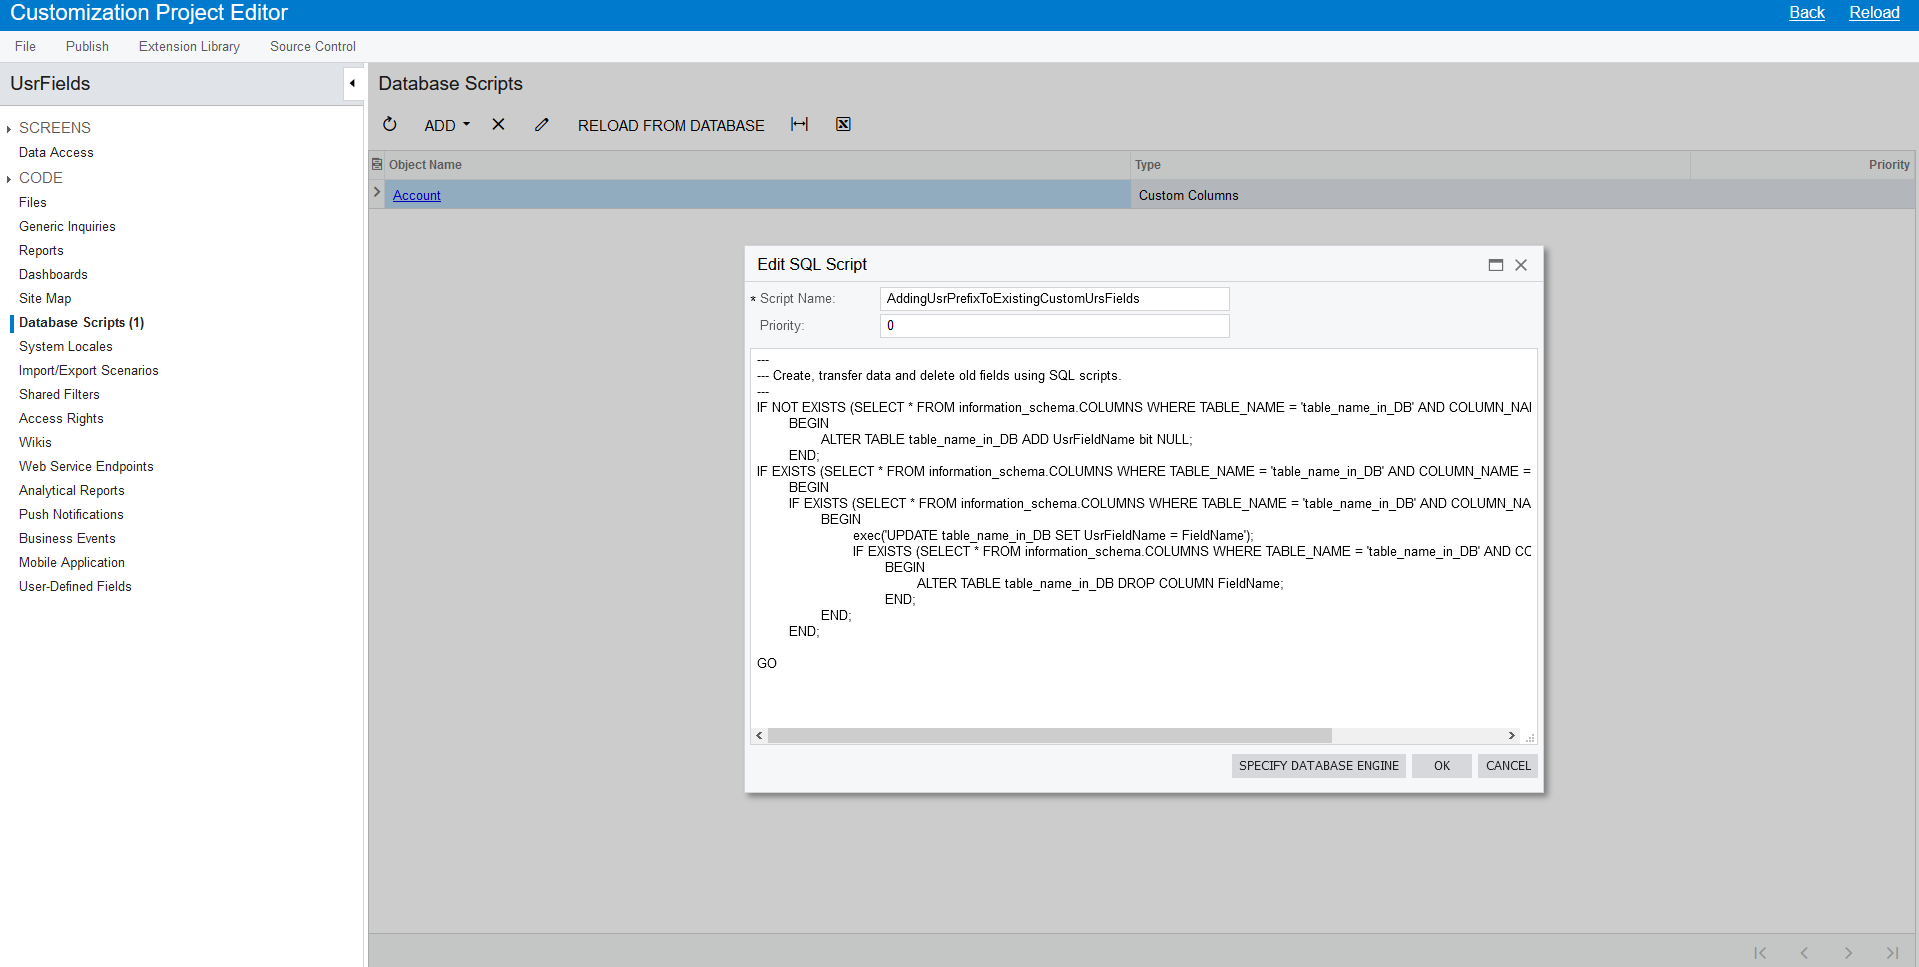
Then create, transfer new data, and delete the old fields with the help of SQL.
Adding new SQL script:
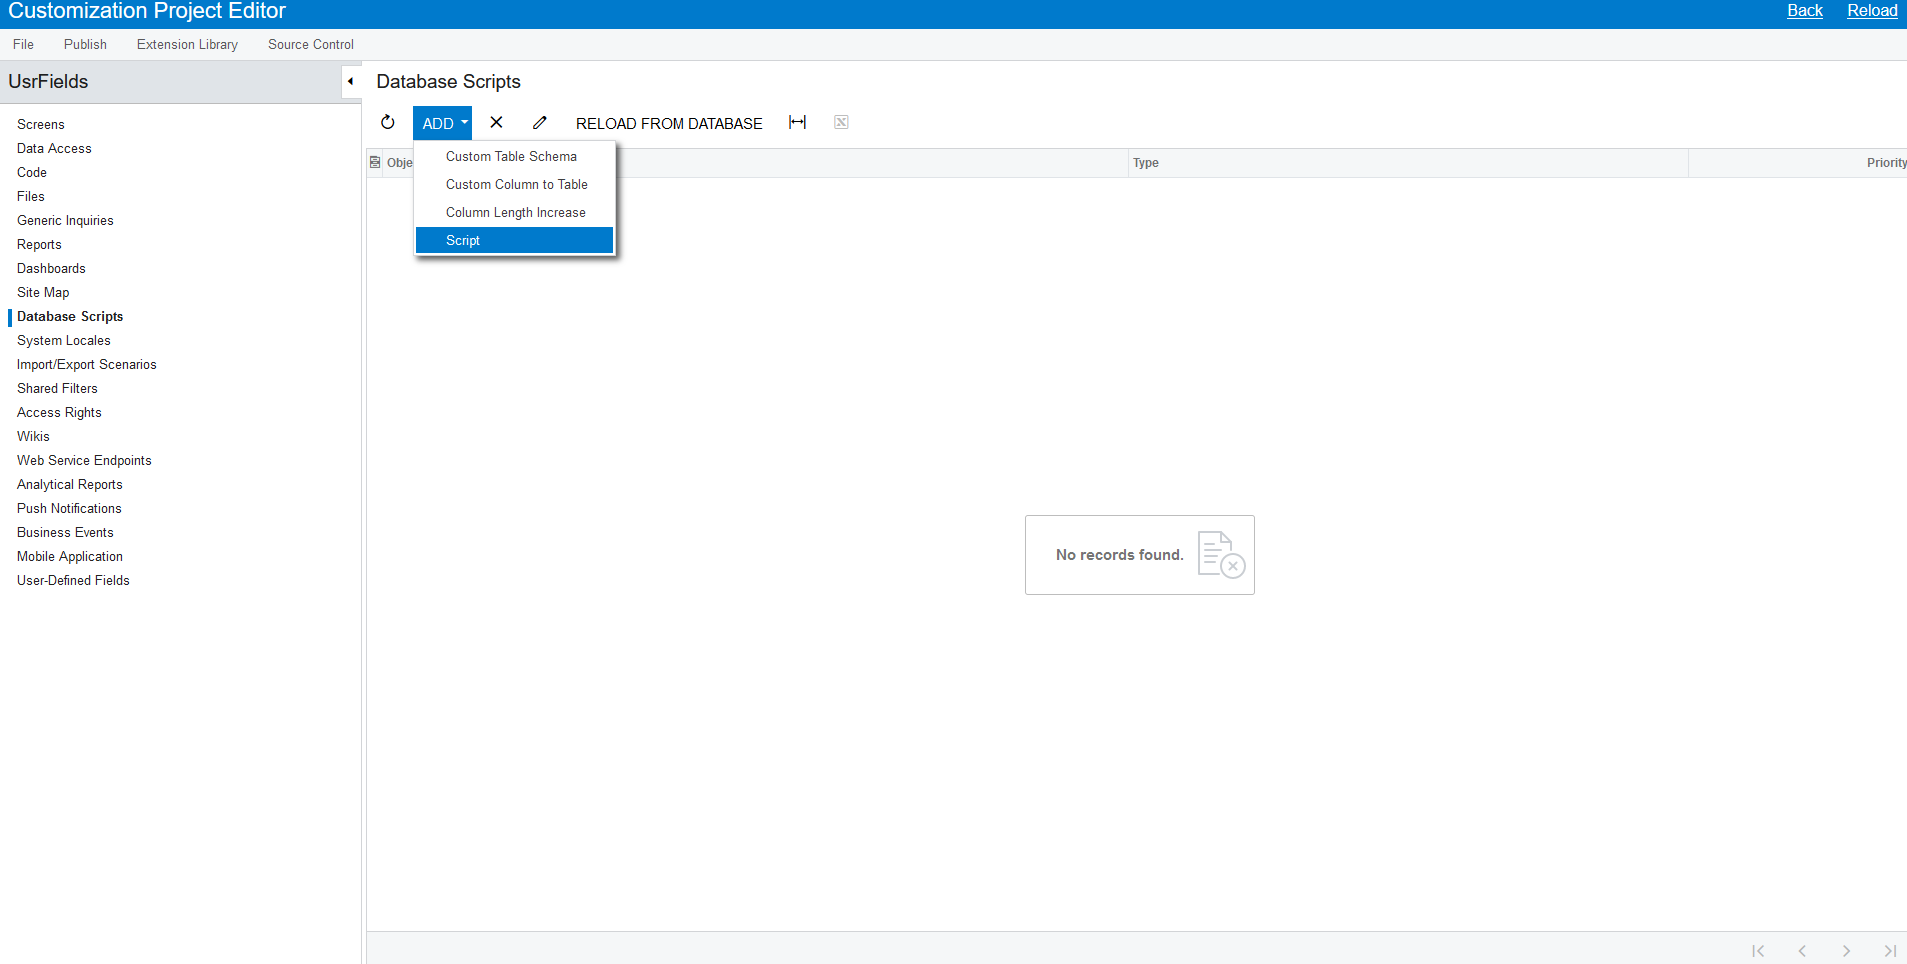
As the next step, write SQL script in the project of customization.
The SQL script below is easy to scale for and adapt to a variety of scripts for changing fields into the fields with Usr prefixes:
IF NOT EXISTS (SELECT * FROM information_schema.COLUMNS WHERE TABLE_NAME = ‘table_name_in_DB’ AND COLUMN_NAME = ‘UsrFieldName’)
BEGIN
ALTER TABLE table_name_in_DB ADD UsrFieldName bit NULL;
END;
IF EXISTS (SELECT * FROM information_schema.COLUMNS WHERE TABLE_NAME = ‘table_name_in_DB’ AND COLUMN_NAME = ‘UsrFieldName’)
BEGIN
IF EXISTS (SELECT * FROM information_schema.COLUMNS WHERE TABLE_NAME = ‘table_name_in_DB’ AND COLUMN_NAME = ‘FieldName’)
BEGIN
exec(‘UPDATE table_name_in_DB SET UsrFieldName = FieldName’);
IF EXISTS (SELECT * FROM information_schema.COLUMNS WHERE TABLE_NAME = ‘table_name_in_DB’ AND COLUMN_NAME = ‘UsrFieldName’)
BEGIN
ALTER TABLE table_name_in_DB DROP COLUMN FieldName;
END;
END;
END;
GO
First, we check whether the new script is to be run as it can not be executed with the repetitive publishings of the project customization, and then check whether the field exists in the relevant DB table. If the field is already there, we do not execute the script, however, if the field does not exist, the script goes to the next step. Then we create the necessary field in the table with Usr prefix.
The following step is to check whether the field already exists, and if so, we need to transfer data from the old field to the new one. Having transferred the data, the process of deletion of the old fields commences.
Now we will look at how to set classes of fields in DAC classes correctly.
If you use the code approach, you will need to set the class of a field in PXCacheExtension to the initial DAC class. To do so all you need is to change the name of an abstract class and give a similar parameter to the inserted BqlType construction:public abstract class usrTrackHours: BqlType <IBqlBool, bool> .Field <usrTrackHours> {}
Also, at this point, it is crucial to monitor closely where in the code this specific field is used, and change the link to it in every place necessary as this is the way to create own fields for the existing tables.
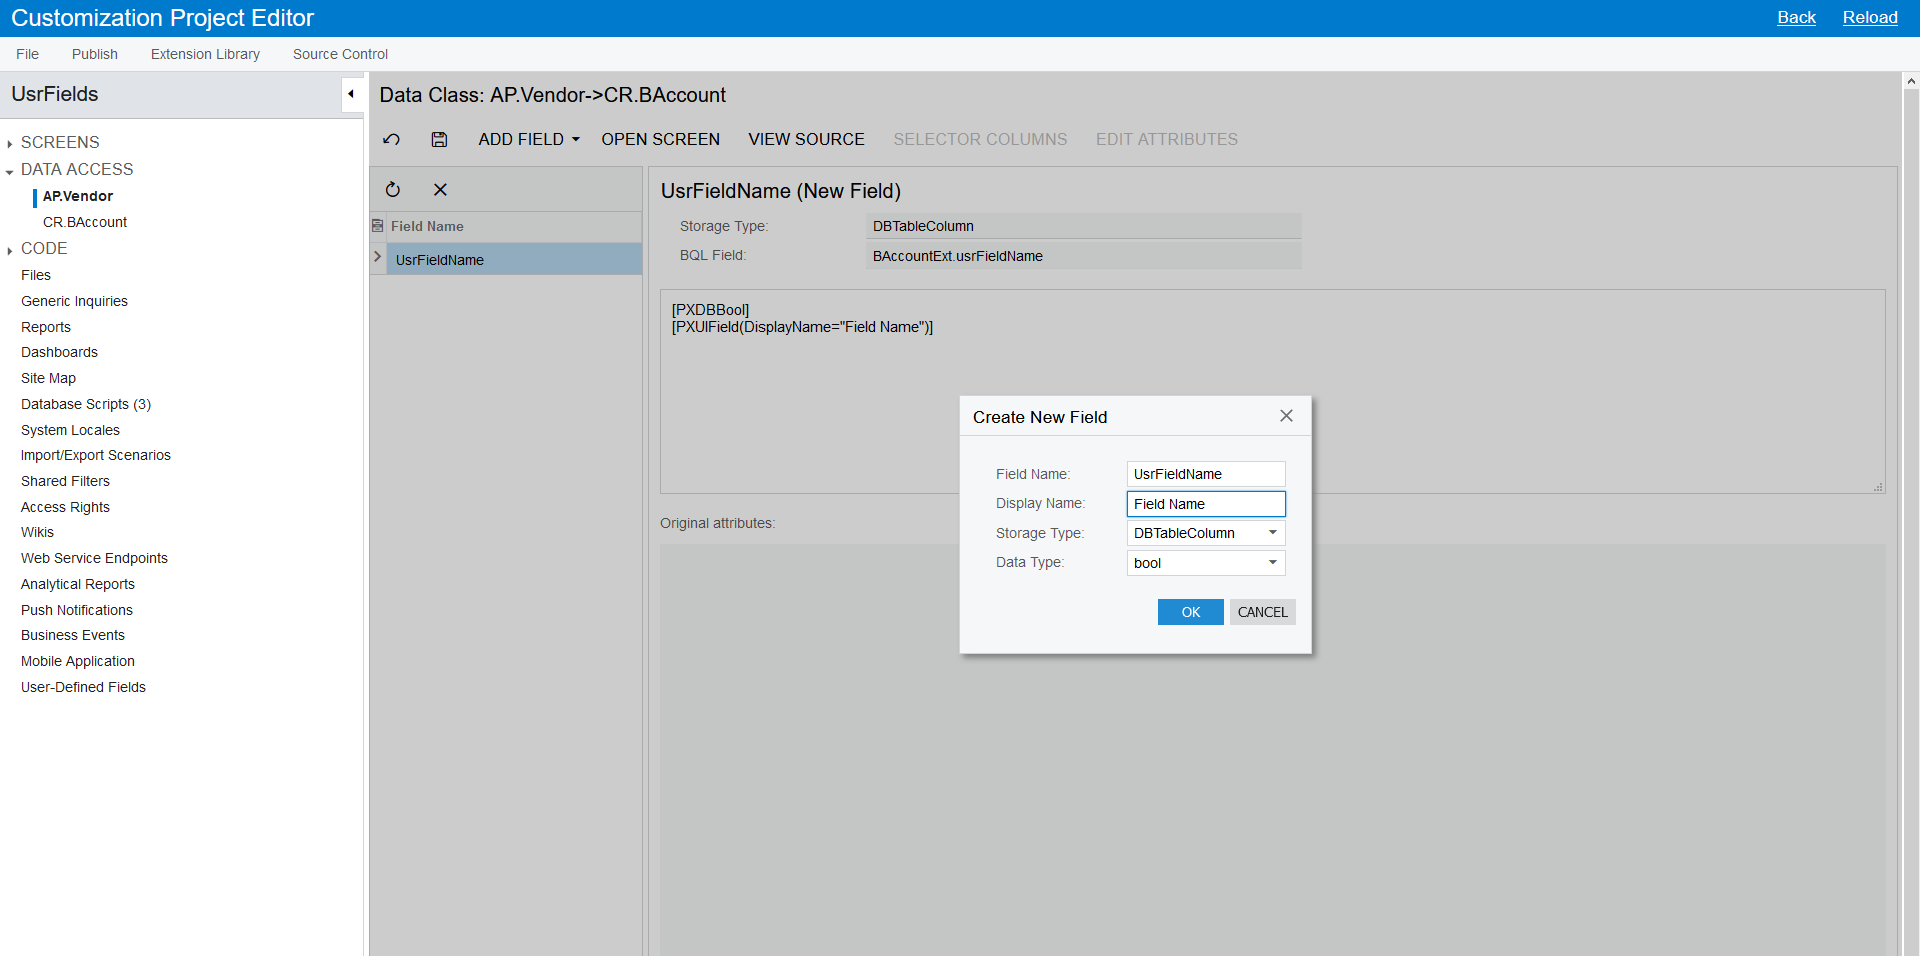
If you use the approach of adding via project interface setting, it will be convenient to open Customization Projects (SM204505) page, and then to go to the menu option DATA ACCESS Add New Record, and there in the dialogue windows the necessary parameters will be set for a field.
However, do not forget to write the name of the field with Usr prefix, for instance, UsrFieldName.
In the picture below you can see the way a new record to access data is added with the help of project interface setting:

As well as setting the necessary parameters for the users’ project interface field setting:
Then we will consider deletion of the fields without the necessary prefix and changing them into the fields with Usr prefix.
Editing XML project in the project setting:
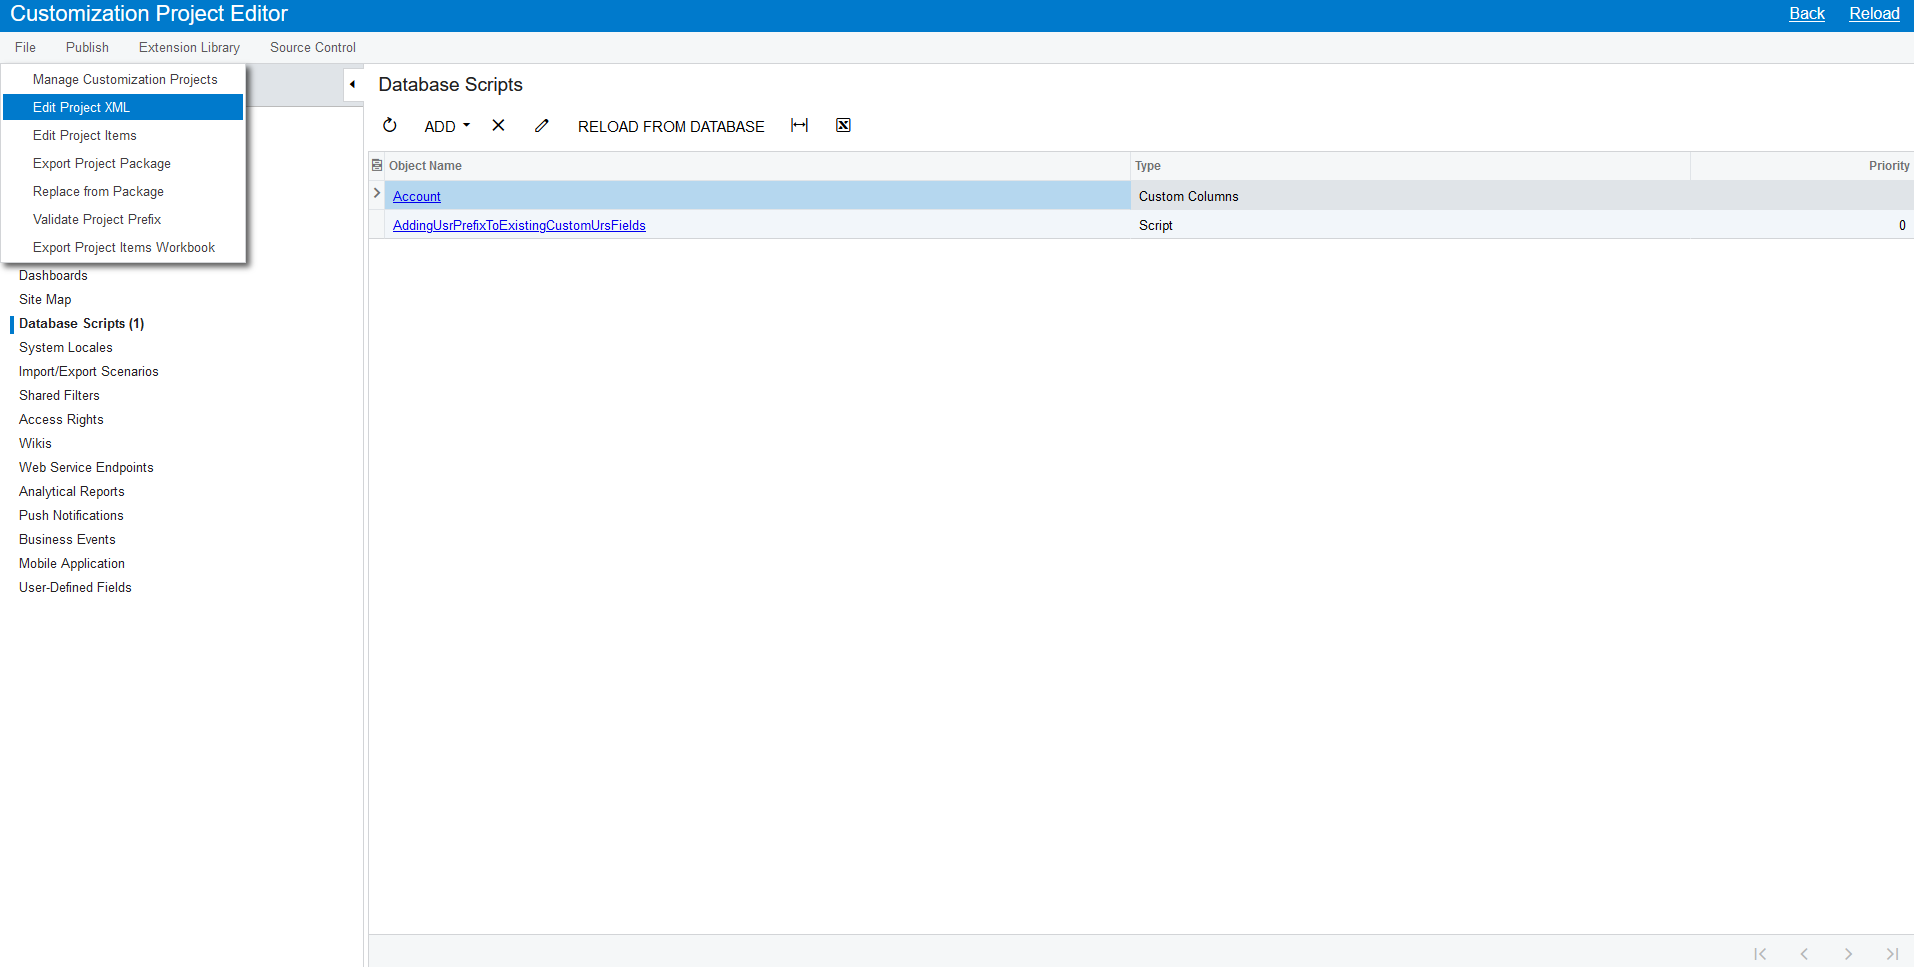
Next we will look at saving XML project in the project setting. To do so, it will be convenient to open Customization Projects (SM204505) page, then go to the menu option File Edit Project XML and replace the necessary fields in the window with XML code.
To do so, change:<Prop Key = “DataField” Value = “FieldName” />into<Prop Key = “DataField” Value = “UsrFieldName” />
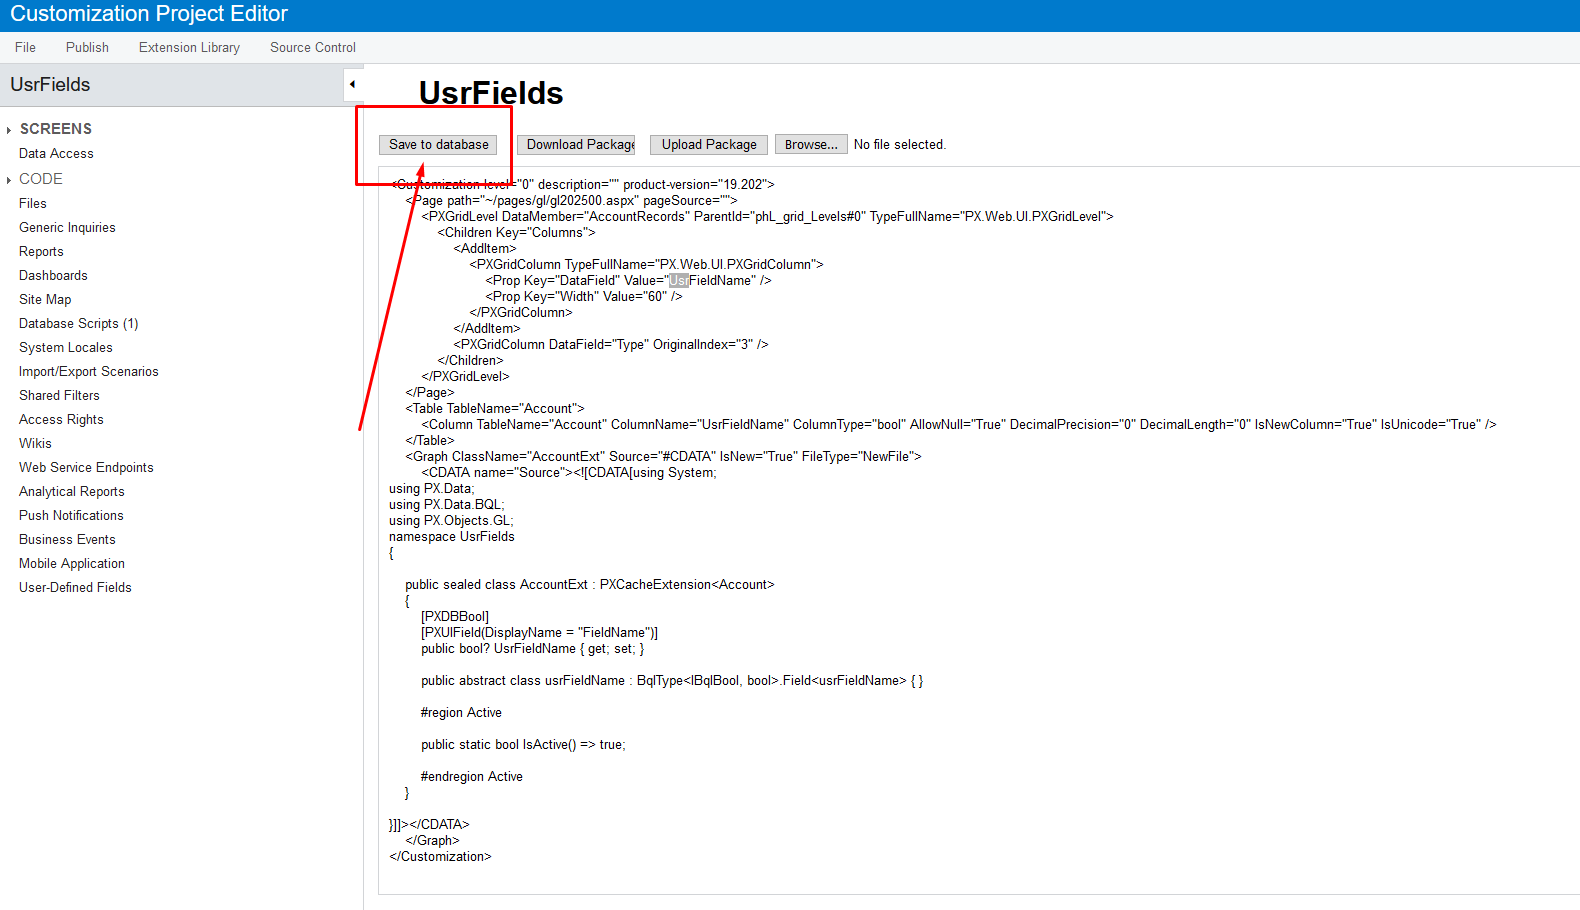
Having performed all the necessary changes, click on “Save to database”. Also, you need to do the publishing of the customisation project followed by the above-mentioned changes.
Conclusion
I hope that by reading this article you will understand that you should not be afraid of perfecting the existing code since by allocating enough time and resources for that, you will eventually be sure that further working with it will not cause unpleasant surprises and extra issues.
Yet one more essential advantage of having performed all the above-mentioned changes is compliance with ISV software certification criteria which are applied to users’ fields determined for DAC classes from Acumatica ERP.
P.S. I would like to express my gratitude to Acumatica team at Sprinterra for their readiness to always assist in any complex or nontrivial situations while developing using Acumatica Framework.
Yuriy Muzychyn
August 2021