We are starting a new series for ERP Acumatica developers. This article is perfect starting point for beginners, demystifying the fundamentals of Acumatica customization.
A standout feature of Acumatica ERP is the ability to create personalized fields, enhancing the system’s standard database tables. Here, we’ll guide you through the seamless process of scripting in the Settings interface to create and integrate these special fields.
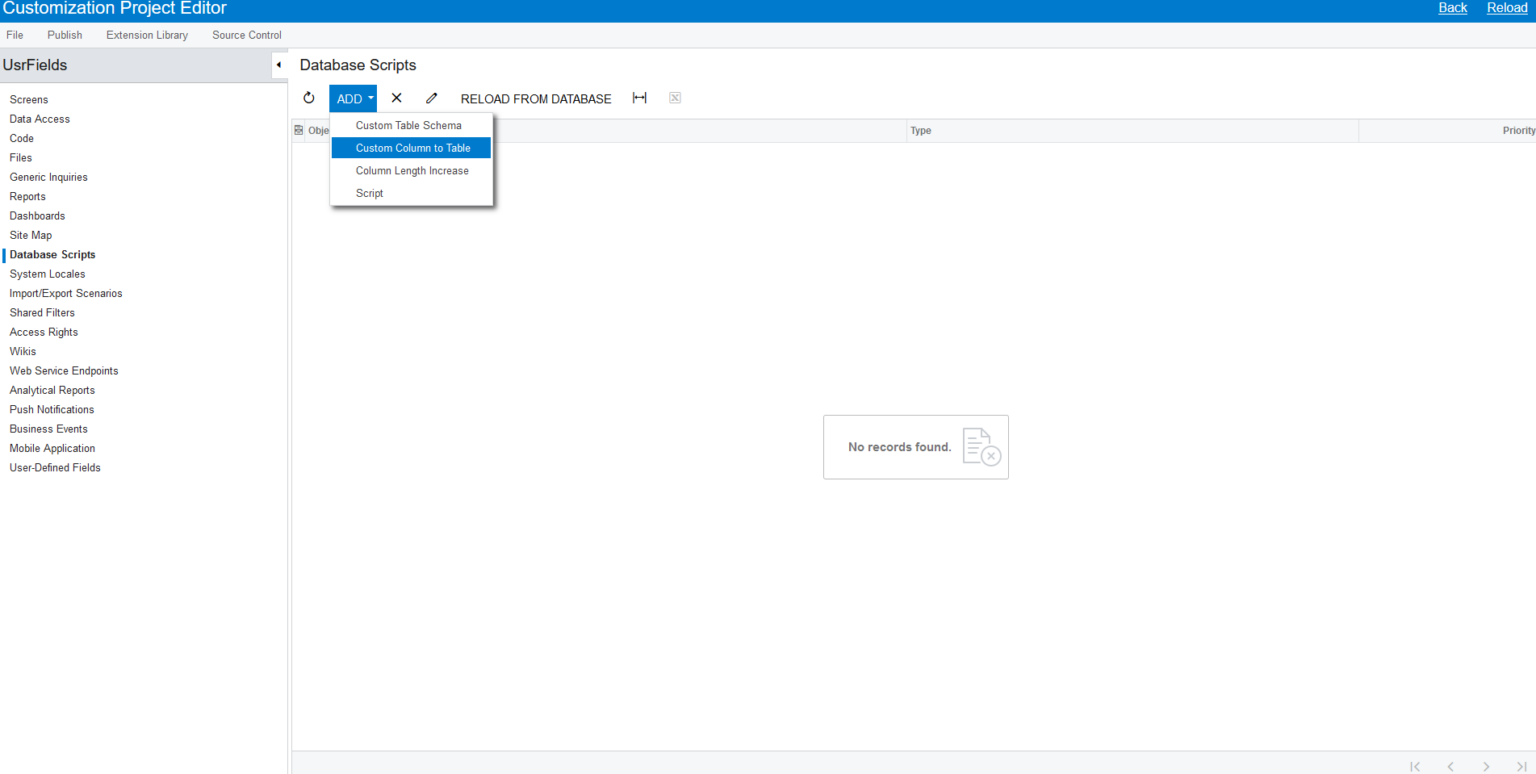
Database scripts Add Custom Column to Table
As you venture into adding custom fields, the crucial PXCacheExtension integration in the output DAC class comes into play, allowing the fields to interact proficiently. Achieving this sets the stage for developers to fully utilize the personalized fields, fostering the ability to:

Adhering to naming conventions is vital. All custom fields must begin with a “Usr” prefix in both the database and the abstract class, aligning with the ISV software certification prerequisites. This practice not only maintains system coherence but also safeguards your software solution’s functionality and data during system upgrades. Explore more on this in the “Acumatica ISV Software Certification Guidelines“.
Here’s a word of caution: failing to adhere to certain guidelines can cause significant issues during system upgrades, including the deletion of user fields. This not only disrupts the functionality of your software solution but also results in data loss in specific fields. As an example, consider this coding snippet:
public abstract class usrFieldName: BqlType <IBqlBool, bool>.Field<usrFieldName> {}.
At a first glance, things might seem straightforward. However, complications arise when existing projects have user fields without the prescribed ‘Usr’ prefix. This could be due to a number of reasons, including insufficient attention to the requirements during development or the incorporation of specific functionalities at the expansion stage.
Correcting this apparent simple error is rather intricate, primarily because data associated with these fields is already housed in the existing database without the ‘Usr’ prefix. But don’t fret, as we’re here to guide you on how to successfully amend this issue. By following the steps outlined below, both your code and settings will align perfectly with the requirements for creating and using special fields. Here’s the action plan:
Let’s explore each step in detail, providing you with a roadmap for a smooth transition to a more efficient and streamlined system
At this point, I want to share with you one of the ways of how to successfully correct this flaw. Following the steps described below, the code itself and the settings will thoroughly comply with the requirements on creating and using special fields. To begin with, we will identify and form a plan of the work and changes which will have to take place:
In the images provided below you can find a more detailed description of these steps.
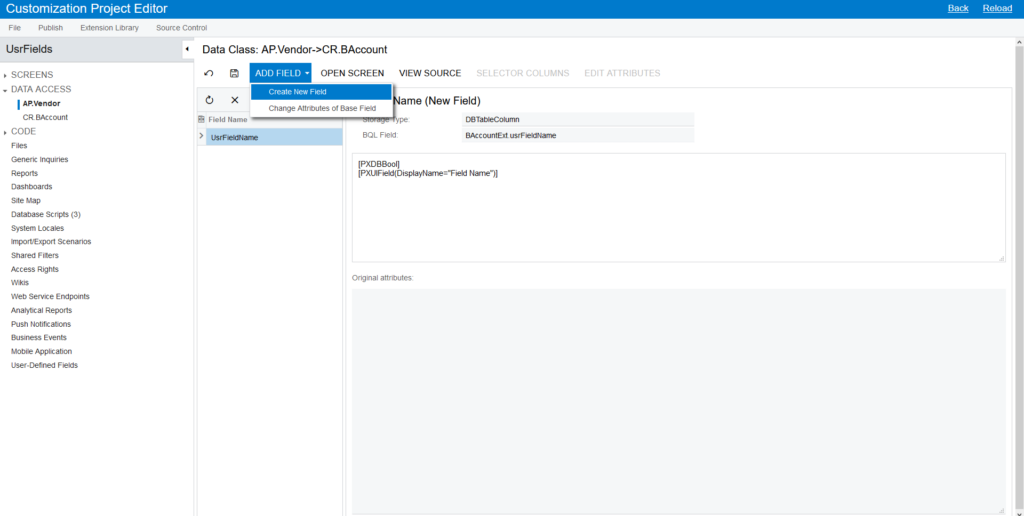
Begin by navigating to the Settings window to create fields equivalent to the existing ones.
Utilize the customization settings interface to craft your own fields seamlessly, as illustrated below:
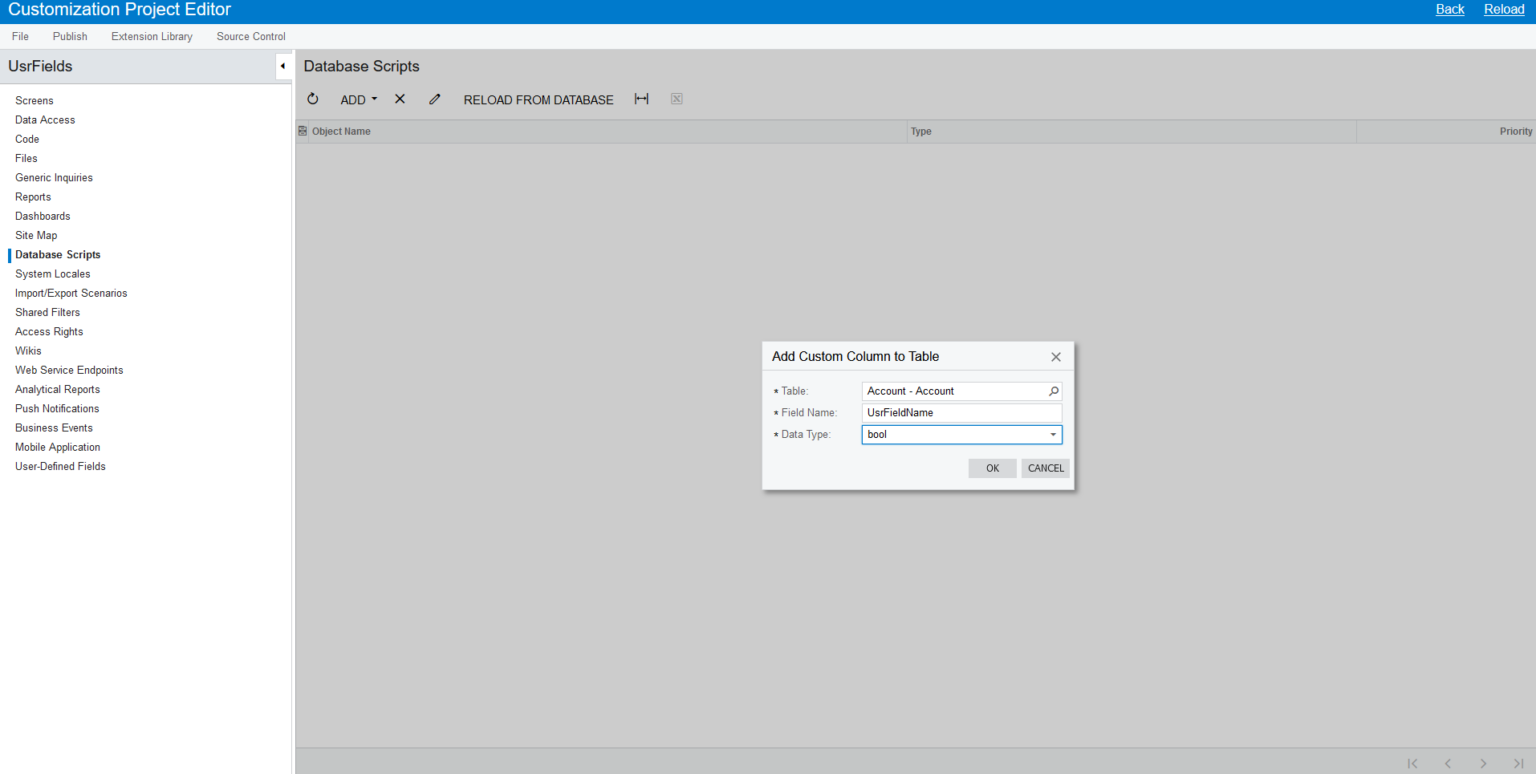
go to the settings on the screen Customization Projects (SM204505), then go to the menu option Database scripts Add Custom Column to Table. In the dialogue window, insert all the necessary parameters equivalent to the fields without the prefix.
Now, let’s get our hands a bit dirty with some SQL scripting. To facilitate a smooth transition, you’ll need to write SQL scripts to transfer data from the old fields to the new ones, followed by the removal of the old fields.
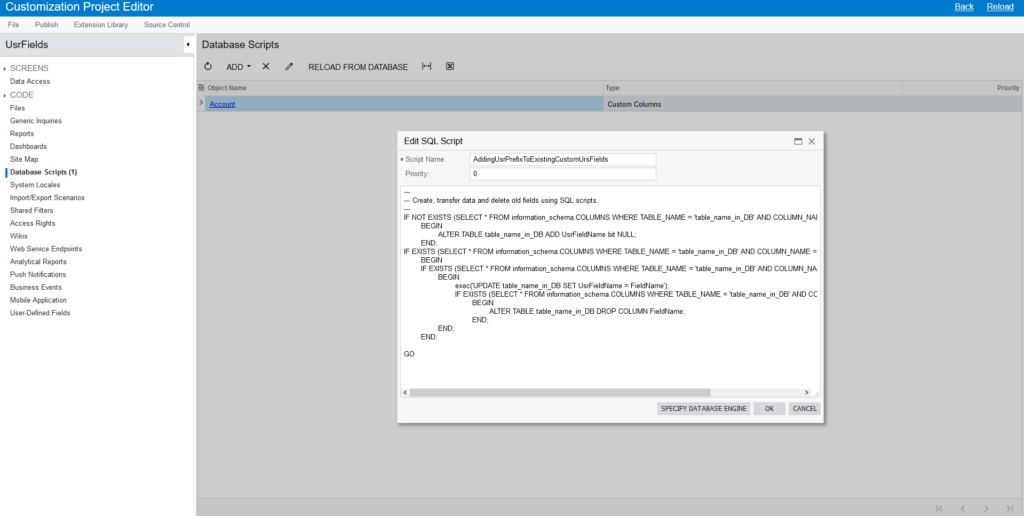
Adding new SQL script:

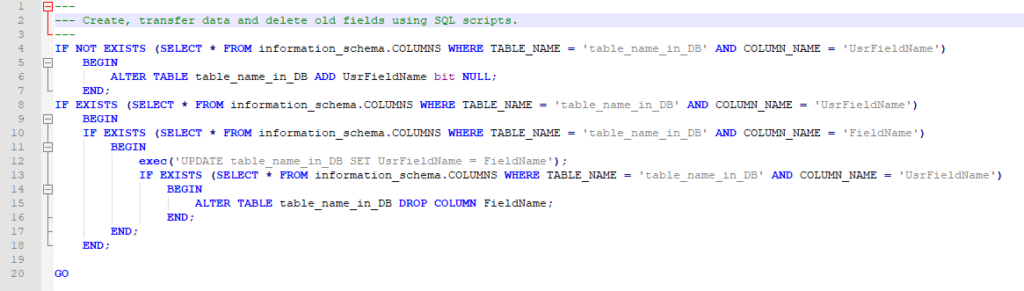
Here’s a flexible SQL script template that can be adapted for various field alterations:
IF NOT EXISTS (SELECT * FROM information_schema.COLUMNS WHERE TABLE_NAME = ‘table_name_in_DB’ AND COLUMN_NAME = ‘UsrFieldName’)
BEGIN
ALTER TABLE table_name_in_DB ADD UsrFieldName bit NULL;
END;
IF EXISTS (SELECT * FROM information_schema.COLUMNS WHERE TABLE_NAME = ‘table_name_in_DB’ AND COLUMN_NAME = ‘UsrFieldName’)
BEGIN
IF EXISTS (SELECT * FROM information_schema.COLUMNS WHERE TABLE_NAME = ‘table_name_in_DB’ AND COLUMN_NAME = ‘FieldName’)
BEGIN
exec(‘UPDATE table_name_in_DB SET UsrFieldName = FieldName’);
IF EXISTS (SELECT * FROM information_schema.COLUMNS WHERE TABLE_NAME = ‘table_name_in_DB’ AND COLUMN_NAME = ‘UsrFieldName’)
BEGIN
ALTER TABLE table_name_in_DB DROP COLUMN FieldName;
END;
END;
END;
GO
This script performs a series of checks and operations to ensure that data is transferred correctly without duplication, followed by the removal of the old fields.
Next, let’s focus on setting the field classes in the DAC correctly. For those using a code approach, align the field class in PXCacheExtension with the initial DAC class. Here’s a snippet to guide you:
Remember to scrutinize your code thoroughly to identify and update all instances where the specific field is utilized.
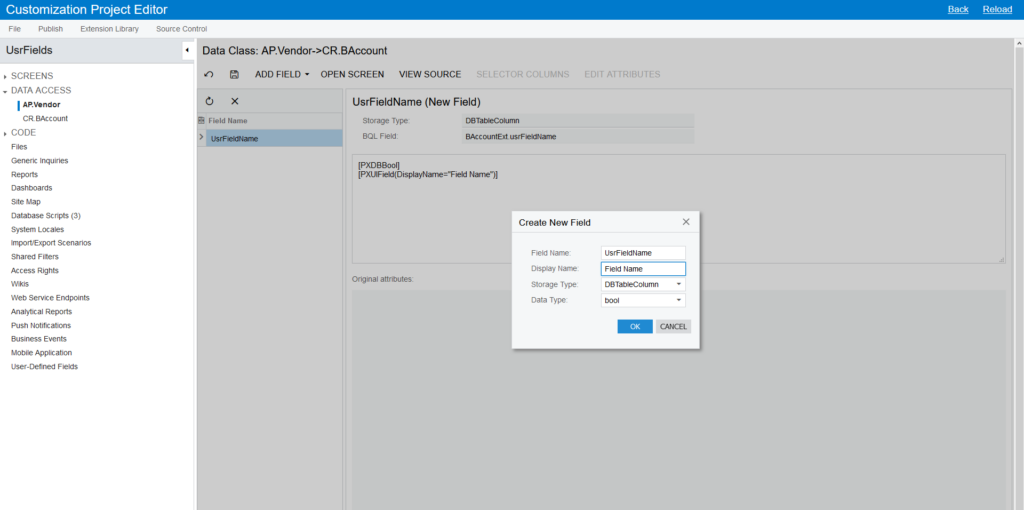
For those preferring a project interface setting, navigate to the Customization Projects (SM204505) page, select the DATA ACCESS > Add New Record menu option, and input the necessary parameters for the new field – don’t forget the ‘Usr’ prefix ( UsrFieldName, for example)
The below image illustrates how to add a new record to access data and setting parameters:
As well as setting the necessary parameters for the users’ project interface field settings:
Then we will consider deletion of the fields without the necessary prefix and changing them into the fields with Usr prefix.
Editing XML project in the project setting:
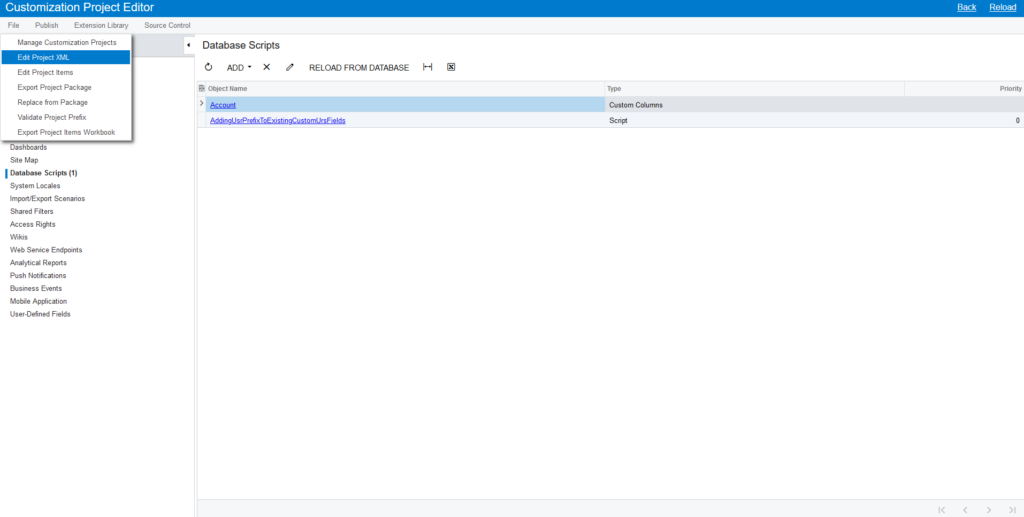
Next we will look at saving XML project in the project setting. To do so, it will be convenient to open Customization Projects (SM204505) page, then go to the menu option File Edit Project XML and replace the necessary fields in the window with XML code.
To do so, change:<Prop Key = “DataField” Value = “FieldName” />into<Prop Key = “DataField” Value = “UsrFieldName” />
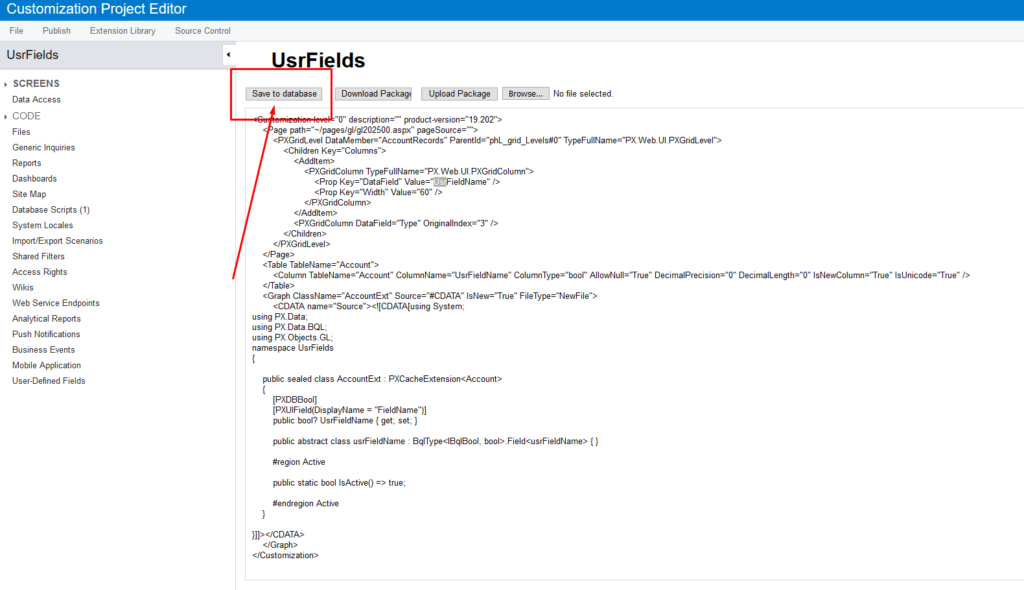
Lastly, it’s time to clean up your website pages. Remove the fields lacking the ‘Usr’ prefix and replace them with their new equivalents.
Once you’ve made all the necessary adjustments, save your changes to the database. Remember to publish your customization project to apply all the changes you’ve made.
Following the completion of these adjustments, ensure to save your progress to the database. Before wrapping up, publish your customization project to enact all the alterations you’ve orchestrated, heralding a new era of streamlined and standardized operations in your Acumatica ERP system.
Remember to always have a backup of your database to prevent any loss of data during this transition.
Thank you for following along, and here’s to a more efficient and optimized Acumatica ERP system!
We’ve visually documented the entire process for your convenience, guiding you step-by-step from the initiation of field creation to the final publishing of your customized project. The journey to mastering Acumatica customization starts with a solid foundation.
Stay tuned for more insights and guided walk-throughs in our series. Our goal is to make your Acumatica customization journey as smooth as possible.
Happy coding!
Taking the first steps in customizing your Acumatica ERP system can be a complex process, but you don’t have to do it alone!
Sprinterra’s Customization Services are here to facilitate a seamless transition, making sure that every detail aligns perfectly with your business goals.
Whether you’re looking to optimize existing functionalities or develop new, groundbreaking features, our seasoned experts are ready to assist you every step of the way. With Sprinterra by your side, you’re not just meeting requirements; you’re exceeding expectations.
🔹 Embark on a Hassle-Free Customization Journey with Sprinterra Today!
Let’s explore how we can make YOUR Acumatica customization project a resounding success – a dynamic, flexible, and robust ERP system, tailored to your unique business needs.
Get the latest insights on exponential technologies delivered straight to you
We use cookies to improve your experience on our site. By using our site, you consent to cookies.
Manage your cookie preferences below:
Essential cookies enable basic functions and are necessary for the proper function of the website.
Google reCAPTCHA helps protect websites from spam and abuse by verifying user interactions through challenges.
Google Tag Manager simplifies the management of marketing tags on your website without code changes.
Statistics cookies collect information anonymously. This information helps us understand how visitors use our website.
Google Analytics is a powerful tool that tracks and analyzes website traffic for informed marketing decisions.
Service URL: policies.google.com (opens in a new window)
Clarity is a web analytics service that tracks and reports website traffic.
Service URL: clarity.microsoft.com (opens in a new window)
Marketing cookies are used to follow visitors to websites. The intention is to show ads that are relevant and engaging to the individual user.
LinkedIn Insight is a web analytics service that tracks and reports website traffic.
Service URL: www.linkedin.com (opens in a new window)
You can find more information in our Cookie Policy and Privacy Policy.